

Introduction
In this tutorial, we will walk through how to create a simple token swap feature in a Next.js application using the Fuse SDK. By the end of this tutorial, you’ll have a working Next.js app that allows users to swap tokens seamlessly.Prerequisites
Before starting, ensure you have the following:- Node.js installed on your machine.
- Code Editor: Use your preferred code editor; VS Code is recommended.
- An EOA wallet with a private key. You can use an existing one or create a new wallet.
- A basic understanding of React.js and Next.js.
- An API key from the Fuse Console. Get one here.
Step 1: Set Up a Next.js Project
If you haven’t already set up a Next.js project, you can create one using the following commands: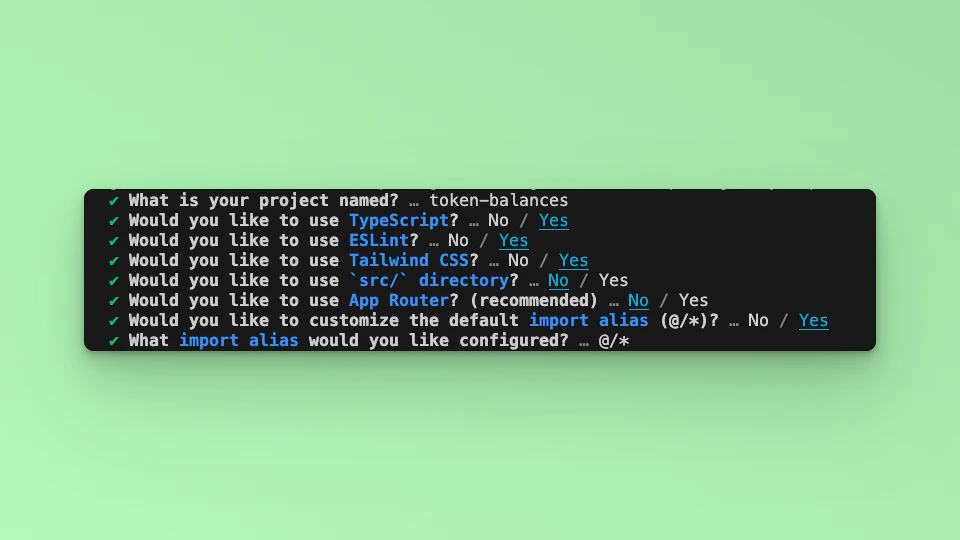
Step 2: Install Required Packages
Install the necessary packages by running the following command in your project directory:Step 3: Import Libraries
Open the index.tsx file, delete the default code from NextJS. Edit index.tsx file by adding the code below and save it to see the updated result in your browser. First, import the required libraries and put up a default `Hello, World!’ text:npm run dev to start the development server. Visit http://localhost:3000 to view your application.
We are going to use the TradeRequest FuseBox Web SDK methods to build the application.
Step 4: Initialize the App State
We are going to first get the Smart Contract Wallet, and it’s owned Tokens and their respective balances, excluding Fuse native token balance. We will handle these information in various state and set/call each as required. We will also implement an App Loading state while waiting for the Promise methods to be resolved. Import theuseState method:
Step 5: Implement The Swap Function
We will implement the methods: init, getSender, getTokenList and getTokenBalance in one method call. Declare the method as smartWalletBalance. Add the following code:Code Breakdown
-
The
handleSwapfunction is the core of our token swap operation. It’s an asynchronous function that handles the entire process when the user submits the form. Here’s what each part does: -
setLoading(true): We set the loading state to true to indicate that the swap process has started. -
Fuse SDK Initialization: We initialize the Fuse SDK by creating a credentials object using the
ethersand then callingFuseSDK.initwith the API key and credentials. This gives us access to the Fuse SDK’s methods. -
tradeRequest: This object defines the swap details, including the input and output tokens and the amount to swap. -
Swap Execution: The fuse.swapTokens(tradeRequest) method initiates the swap. The result is stored in the swapResult state. -
Error Handling: If something goes wrong during the swap, we catch the error and update swapResult to inform the user. -
setLoading(false): Finally, we reset the loading state to false, regardless of whether the swap succeeded or failed.
Step 6: Update the UI
http://localhost:3000 in your browser to see the application in action.
Congratulations! You have successfully implemented a token swap feature in a Next.js app using the Fuse SDK and styled it with Tailwind CSS. This simple yet powerful feature can be extended and integrated into larger applications where token swaps are necessary.
Checkout the complete code. 💻