How to Retrieve Token information using FuseBox Web SDK
In this tutorial, we'll explore using the FuseBox Web SDK to build a Next.js application to display Token Address information. This is a prerequisite to building applications where developers can read Token information from the Blockchain and build Dashboards and visualizers. This guide can be relied on for all interactions involving GET requests, which do not cause state changes on the Fuse Blockchain.
Prerequisites
Before we begin, ensure you have the following:
- Node.js is installed on your machine. You can download it from here.
- Code Editor: Use your preferred code editor; VS Code is recommended.
- An EOA wallet with a private key. You can use an existing one or create a new wallet.
- Basic Understanding of JavaScript: Familiarity with JavaScript will be helpful.
Step 1: Set Up Your Project
Create a new project folder and initialize it using Node.js:
mkdir new-project && cc new-project
npm init -y
Step 2: Set Up Your Next.js App
Create a new Next.js app:
npx create-next-app my-fuse-nft-app
cd my-fuse-nft-app
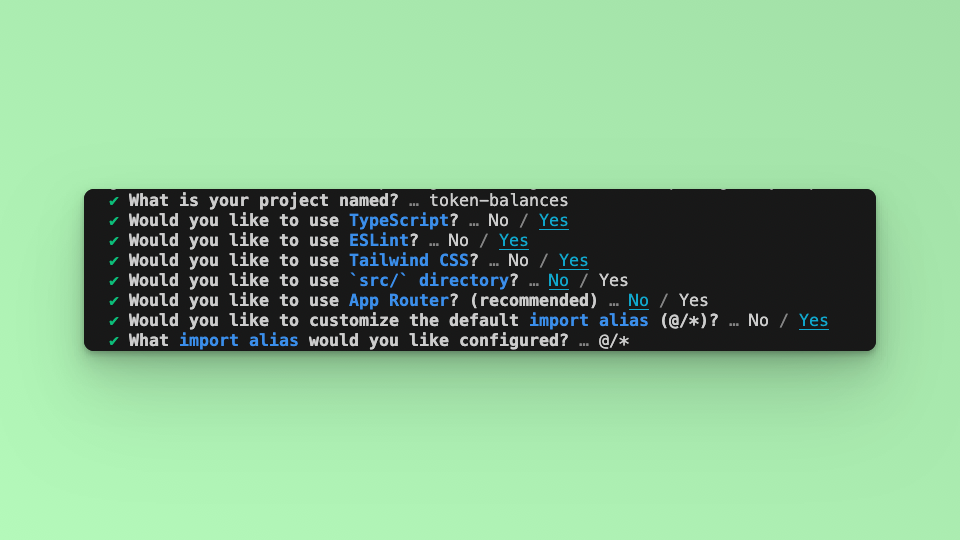
Answer the required prompts from NextJS in the terminal. We must note that we use TypeScript and Tailwind CSS for this application.
Step 3: Install Dependencies
Install the required dependencies:
npm install @fuseio/fusebox-web-sdk
The application has two primary functions: GET Token and Token Price details. Both actions will be carried out using the FuseBox Web SDK. We will also use the EthersJS Library for particular Wallet methods. Install the EthersJS library; we will use v6.
npm install ethers
Step 4: Import Libraries
Open the index.tsx file, delete the default code from NextJS. First, import the required libraries and put up a default `Hello, World!’ text:
import { FuseSDK } from "@fuseio/fusebox-web-sdk";
import { ethers } from "ethers";

export default function Home() {
  return (
    <main className={`flex flex-col items-center p-24 ${inter.className}`}>
      Hello, World!
    </main>
  );
}
Step 5: Dashboard
This is a guide to GET requests using the FuseBox SDK. In this example, we are using the GET Token Details and GET Token Price methods to illustrate how a developer can call the methods and build a simple interactive user interface.
To interact with the FuseBox Web SDK, you need to initialize the SDK by parsing an API Key and the Private Key of an EOA. You can get an API Key here.
To parse the Data, we will write an asynchronous function called tokenInfo where we await the responses for each token price, as it is a promise. To mount the state and prevent reloads, we will use the useEffect hook.
Start with USDT.
export default function Home() {

const [usdt, setUSDT] = useState({})
const [usdtP, setUsdtP] = useState(0);

const tokenInfo = async () => {
console.log("Hello world!")
const apiKey = "API_KEY";
const credentials = new ethers.Wallet(`0xPrivateKey`);
const fuseSDK = await FuseSDK.init(apiKey, credentials, {
  withPaymaster: true,
});

//USDC
//USDT
const usdtTokenAddress = "0x68c9736781E9316ebf5c3d49FE0C1f45D2D104Cd";
const usdtTokenDetails = await fuseSDK.explorerModule.getTokenDetails(usdtTokenAddress);
console.log(usdtTokenDetails)
setUSDT(usdtTokenDetails)
const usdtPrice = await fuseSDK.tradeModule.price(usdtTokenAddress);
console.log(`Token: ${usdtTokenAddress} price: ${usdtPrice}`)
setUsdtP(usdtPrice);
console.log(usdtPrice)
}

useEffect(() => {
tokenInfo()
console.log(usdc)
}, [])
}
Save the file. Go to the tab where the app is running and check the console. You will see the USDC Token Information and Price logged into the console.
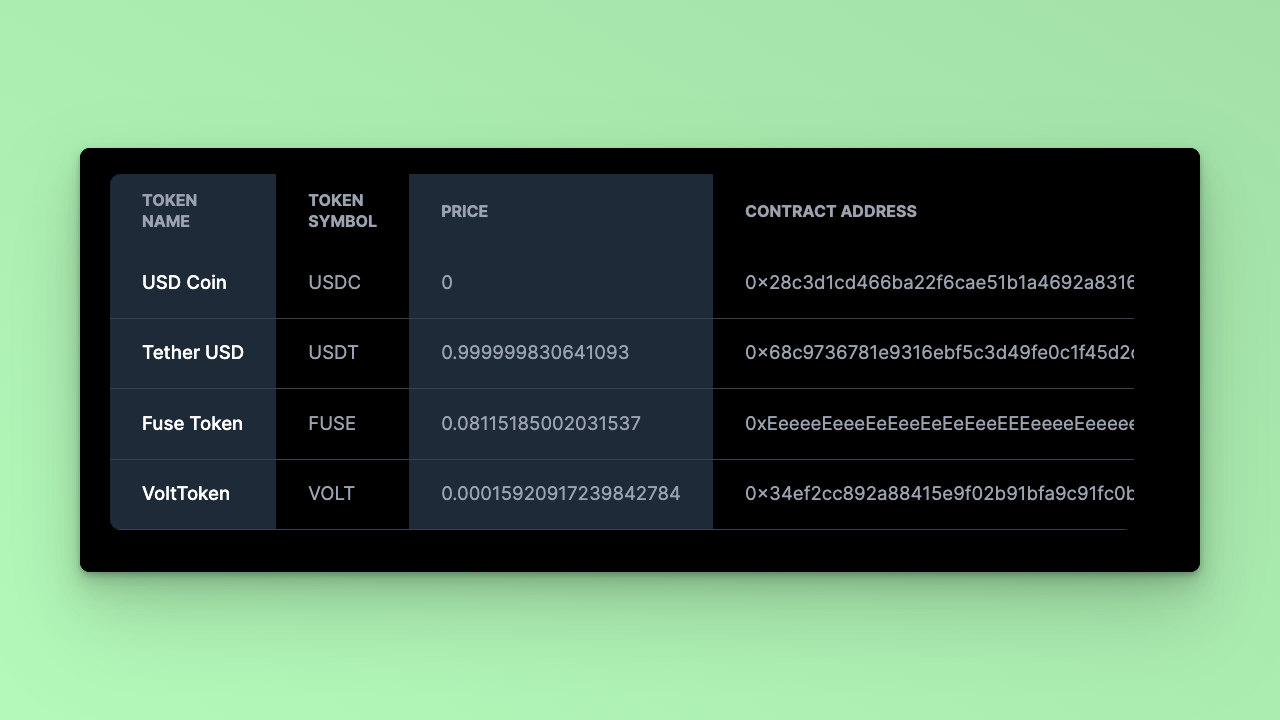
To display more token information, we can use a Table to display the User Interface.
In this example we add more tokens usdc, volt and fuse:
const [usdc, setUSDC] = useState({})
const [fuse, setFUSE] = useState({})
const [volt, setVOLT] = useState({})
const [usdcP, setUsdcP] = useState(0);
const [fuseP, setFuseP] = useState(0);
const [voltP, setVoltP] = useState(0);

//USDC
const usdcTokenAddress = "0x28C3d1cD466Ba22f6cae51b1a4692a831696391A";
const tokenDetails = await fuseSDK.explorerModule.getTokenDetails(usdcTokenAddress);
setUSDC(tokenDetails)
const usdcPrice = await fuseSDK.tradeModule.price(usdcTokenAddress);
setUsdcP(usdcPrice);

//FUSE
const fuseTokenAddress = "0xEeeeeEeeeEeEeeEeEeEeeEEEeeeeEeeeeeeeEEeE";
const fuseTokenDetails = await fuseSDK.explorerModule.getTokenDetails(fuseTokenAddress);
setFUSE(fuseTokenDetails)
const fusePrice = await fuseSDK.tradeModule.price(fuseTokenAddress);
setFuseP(fusePrice);

//VOLT
const voltTokenAddress = "0x34Ef2Cc892a88415e9f02b91BfA9c91fC0bE6bD4";
const voltTokenDetails = await fuseSDK.explorerModule.getTokenDetails(voltTokenAddress);
setVOLT(voltTokenDetails)
const voltPrice = await fuseSDK.tradeModule.price(voltTokenAddress);
setVoltP(voltPrice);
Step 6: The UI
Upate the return statement:
  return (
    <main className={`flex min-h-screen flex-col p-24 ${inter.className}`}>
        <div className="relative overflow-x-auto shadow-md sm:rounded-lg">
            <table className="w-full text-sm text-left rtl:text-right text-gray-500 dark:text-gray-400">
                <thead className="text-xs text-gray-700 uppercase dark:text-gray-400">
                    <tr>
                        <th scope="col" className="px-6 py-3 bg-gray-50 dark:bg-gray-800">
                            Token Name
                        </th>
                        <th scope="col" className="px-6 py-3">
                            Token Symbol
                        </th>
                        <th scope="col" className="px-6 py-3 bg-gray-50 dark:bg-gray-800">
                            Price
                        </th>
                        <th scope="col" className="px-6 py-3">
                            Contract Address
                        </th>
                    </tr>
                </thead>
                <tbody>
                    <tr className="border-b border-gray-200 dark:border-gray-700">
                        <th scope="row" className="px-6 py-4 font-medium text-gray-900 whitespace-nowrap bg-gray-50 dark:text-white dark:bg-gray-800">
                            {usdc.name}
                        </th>
                        <td className="px-6 py-4">
                            {usdc.symbol}
                        </td>
                        <td className="px-6 py-4 bg-gray-50 dark:bg-gray-800">
                            {usdcP}
                        </td>
                        <td className="px-6 py-4">
                            {usdc.address}
                        </td>
                    </tr>
                    <tr className="border-b border-gray-200 dark:border-gray-700">
                        <th scope="row" className="px-6 py-4 font-medium text-gray-900 whitespace-nowrap bg-gray-50 dark:text-white dark:bg-gray-800">
                            {usdt.name}
                        </th>
                        <td className="px-6 py-4">
                            {usdt.symbol}
                        </td>
                        <td className="px-6 py-4 bg-gray-50 dark:bg-gray-800">
                            {usdtP}
                        </td>
                        <td className="px-6 py-4">
                            {usdt.address}
                        </td>
                    </tr>
                    <tr className="border-b border-gray-200 dark:border-gray-700">
                        <th scope="row" className="px-6 py-4 font-medium text-gray-900 whitespace-nowrap bg-gray-50 dark:text-white dark:bg-gray-800">
                            {fuse.name}
                        </th>
                        <td className="px-6 py-4">
                            {fuse.symbol}
                        </td>
                        <td className="px-6 py-4 bg-gray-50 dark:bg-gray-800">
                            {fuseP}
                        </td>
                        <td className="px-6 py-4">
                            {fuse.address}
                        </td>
                    </tr>
                    <tr className="border-b border-gray-200 dark:border-gray-700">
                        <th scope="row" className="px-6 py-4 font-medium text-gray-900 whitespace-nowrap bg-gray-50 dark:text-white dark:bg-gray-800">
                            {volt.name}
                        </th>
                        <td className="px-6 py-4">
                            {volt.symbol}
                        </td>
                        <td className="px-6 py-4 bg-gray-50 dark:bg-gray-800">
                            {voltP}
                        </td>
                        <td className="px-6 py-4">
                            {volt.address}
                        </td>
                    </tr>
                </tbody>
            </table>
        </div>
    </main>
  );
Conclusion:
In this tutorial, we've demonstrated how to retrieve token information using the FuseBox Web SDK in a Next.js application. With this knowledge, you can build powerful decentralized applications on the Fuse blockchain that interact seamlessly with tokens. Expand on this code and explore further possibilities for adding token information into your projects, and other non-state changing methods available via the SDK.