> ## Documentation Index
> Fetch the complete documentation index at: https://docs.fuse.io/llms.txt
> Use this file to discover all available pages before exploring further.
# REST API - How to Get Token Balances for Address
# Introduction
In this tutorial, we'll walk through fetching token balances for an Address using the FuseBox REST API in a Next.js application. We'll utilize React hooks to manage the State and display the token balances in a table format.
## Prerequisites
Before starting, ensure you have the following:
* Node.js installed on your machine.
* Code Editor: Use your preferred code editor. VS Code is recommended.
* An EOA wallet with a private key. You can use an existing one or create a new wallet.
* A basic understanding of React.js and Next.js.
* An API key from the Fuse Console. Get one [here](https://console.fuse.io/build).
## Step 1: Set Up a Next.js Project
If you haven't already set up a Next.js project, you can create one using the following commands:
```bash theme={null}
npx create-next-app my-project
cd my-project
```
Answer the required prompts from NextJS in the terminal. We must note that we use TypeScript and Tailwind CSS for this application.
 ## Step 2: Update the UI
In this example tutorial, we are going to build a Form element that takes in any External Owned Address or Smart Contract Address and return its balance in a Table. We will use the Fetch API method to call the Fuse REST APIs and return the responses.
The end point that we will use in this tutorial is the [Get Fungible ERC20 Token Balances](/api-reference/erc20-tokens/get-fungible-erc20-token-balances).
The URL takes in the EOA or SCA, below is an example:
[`https://api.fuse.io/api/v0/balances/assets/0x07dc9cb1d2f8e7acf92c856cf43467936203f26a?apiKey=API_KEY`](https://api.fuse.io/api/v0/balances/assets/0x07dc9cb1d2f8e7acf92c856cf43467936203f26a?apiKey=API_KEY)
Replace `API_KEY` with your actual `apiKey` too see the response. [Get an API KEY](https://console.fuse.io/build).
## Step 3: Fetch the API response.
In this step, we will test calling the API and parsing the response to the web browser console. Add the following code to index.tsx before the `return` statement.
```javascript theme={null}
const apiUrl = `https://api.fuse.io/api/v0/balances/assets/0x07dc9cb1d2f8e7acf92c856cf43467936203f26a?apiKey=API_KEY`;
async function fetchData() {
try {
const response = await fetch(apiUrl);
if (!response.ok) {
throw new Error("Network response was not ok");
}
const data = await response.json();
console.log(data);
} catch (error) {
console.error("There was a problem with the fetch operation:", error);
}
}
fetchData();
```
Save the file.
Run the application using the command:
```javascript theme={null}
npm run dev
```
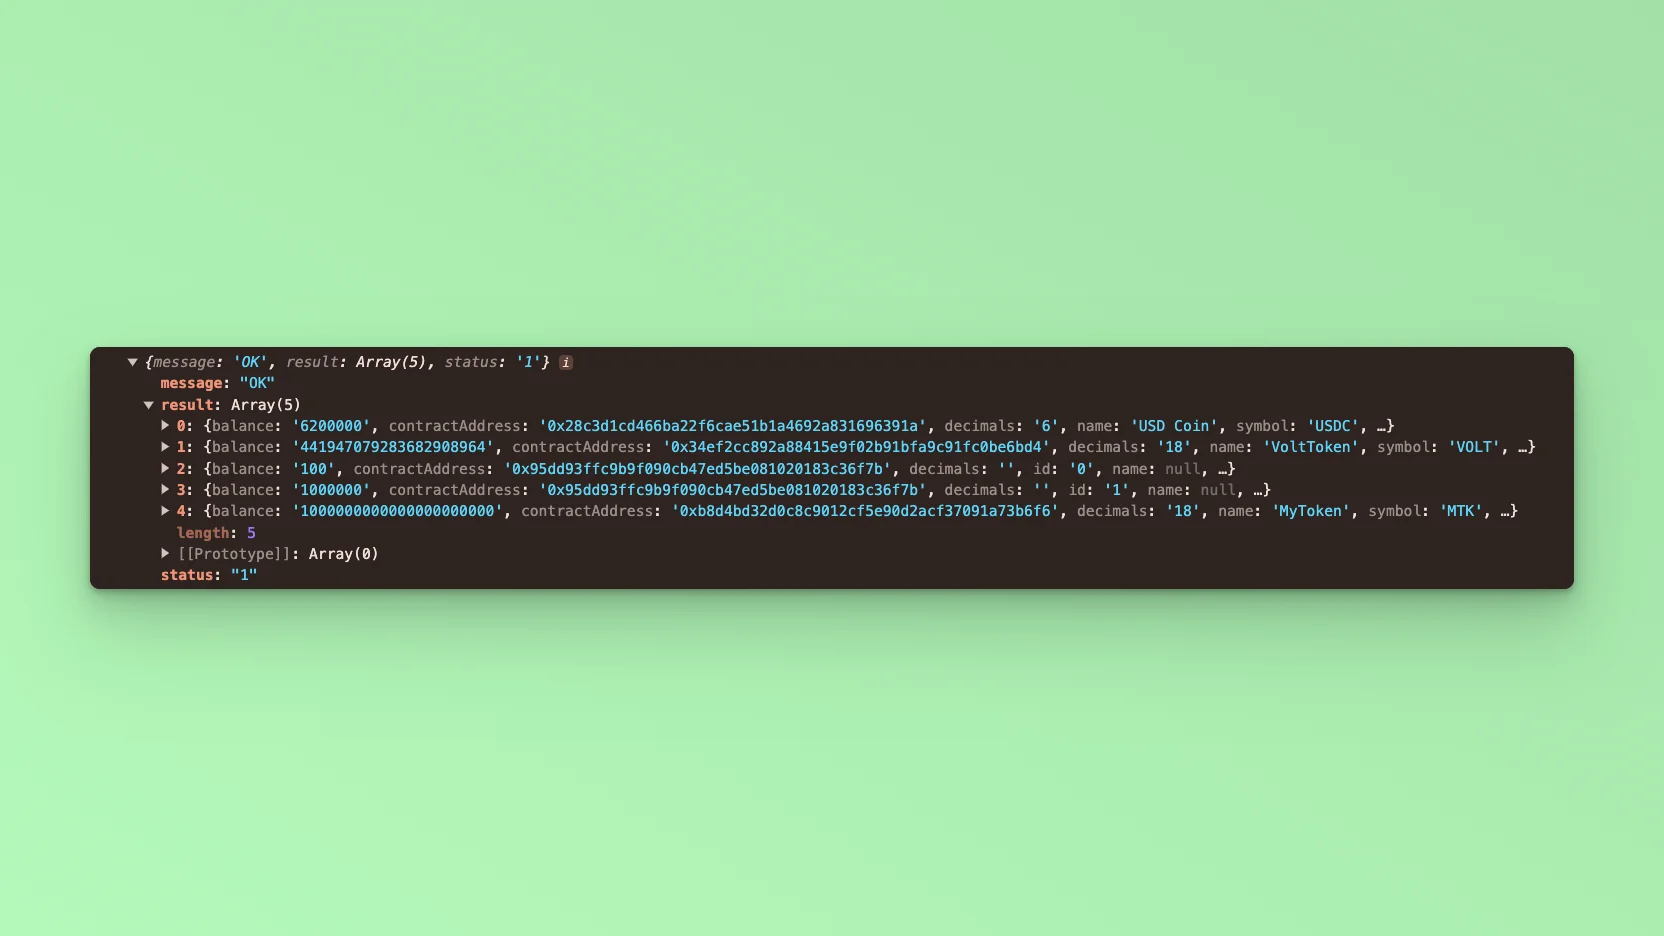
Open your browser go to `http://localhost:3000` and open the developer console, you will find the results logged to the console.
## Step 2: Update the UI
In this example tutorial, we are going to build a Form element that takes in any External Owned Address or Smart Contract Address and return its balance in a Table. We will use the Fetch API method to call the Fuse REST APIs and return the responses.
The end point that we will use in this tutorial is the [Get Fungible ERC20 Token Balances](/api-reference/erc20-tokens/get-fungible-erc20-token-balances).
The URL takes in the EOA or SCA, below is an example:
[`https://api.fuse.io/api/v0/balances/assets/0x07dc9cb1d2f8e7acf92c856cf43467936203f26a?apiKey=API_KEY`](https://api.fuse.io/api/v0/balances/assets/0x07dc9cb1d2f8e7acf92c856cf43467936203f26a?apiKey=API_KEY)
Replace `API_KEY` with your actual `apiKey` too see the response. [Get an API KEY](https://console.fuse.io/build).
## Step 3: Fetch the API response.
In this step, we will test calling the API and parsing the response to the web browser console. Add the following code to index.tsx before the `return` statement.
```javascript theme={null}
const apiUrl = `https://api.fuse.io/api/v0/balances/assets/0x07dc9cb1d2f8e7acf92c856cf43467936203f26a?apiKey=API_KEY`;
async function fetchData() {
try {
const response = await fetch(apiUrl);
if (!response.ok) {
throw new Error("Network response was not ok");
}
const data = await response.json();
console.log(data);
} catch (error) {
console.error("There was a problem with the fetch operation:", error);
}
}
fetchData();
```
Save the file.
Run the application using the command:
```javascript theme={null}
npm run dev
```
Open your browser go to `http://localhost:3000` and open the developer console, you will find the results logged to the console.
 ## Step 4: Table UI
To return the response via the UI, we will use a Table. Copy the code below:
```javascript theme={null}
## Step 4: Table UI
To return the response via the UI, we will use a Table. Copy the code below:
```javascript theme={null}
Address: {address}
|
Token Symbol
|
Contract Address
|
Balance
|
|
symbol
|
contractAddress |
balance |
```
Save the file.
To parse the responses via the UI, we will use React useState to update the UI components. Create an `interface` to handle the Token response object:
```javascript theme={null}
interface Token {
symbol: string
contractAddress: string
balance: number
type: string
}
```
Create a state to store the responses from the Fetch call using the Token interface.
```javascript theme={null}
const [tokenData, setTokenData] = useState([]);
```
Update the FetchData function by parsing the data response to the state:
```javascript theme={null}
setTokenData(data.result);
```
Update the table body by calling the map() method:
```javascript theme={null}
{
tokenData.map((token, index) => (
|
{token.symbol}
|
{token.contractAddress} |
{token.balance} |
));
}
```
Save the file.
## Step 5: Form UI.
In this step, we add a form component with an input where users can enter any address instead of hard coding it to the URL. Add a form component to the application. Copy and paste the following code snippet directly above the `` component in your `index.tsx` file.
```javascript theme={null}
```
Add an event method to take input from the form:
```javascript theme={null}
const handleReturnBalances = async (e) => {
e.preventDefault();
};
```
Add a state to handle the address from the input. When the `address` is received from the Form input, it will be parsed to the API URL as a parameter `address=${address}` replacing the hardcoded address.
```javascript theme={null}
const [address, setAddress] = useState < string > "";
```
Update the `apiUrl`, use backticks:
```javascript theme={null}
const apiUrl = `https://api.fuse.io/api/v0/balances/assets/${address}?apiKey=API_KEY`;
```
Update the Form Input elements by adding `value` and `onchange` arguments. We will set the state when calling onchange:
```javascript theme={null}
value={address}
onChange={(e) => setAddress(e.target.value)}
```
Update the Form submit argument by parsing `handleReturnBalance`:
```javascript theme={null}
onSubmit = {handleReturnBalances};
```
Before saving the file, move the FetchData call to the handleReturnBalances, so that we can get the response as soon as we hit submit on the Form:
```javascript theme={null}
const handleReturnBalances = async (e) => {
e.preventDefault();
fetchData();
};
```
Save the file.
Run the application using the following command:
```javascript theme={null}
npm run dev
```
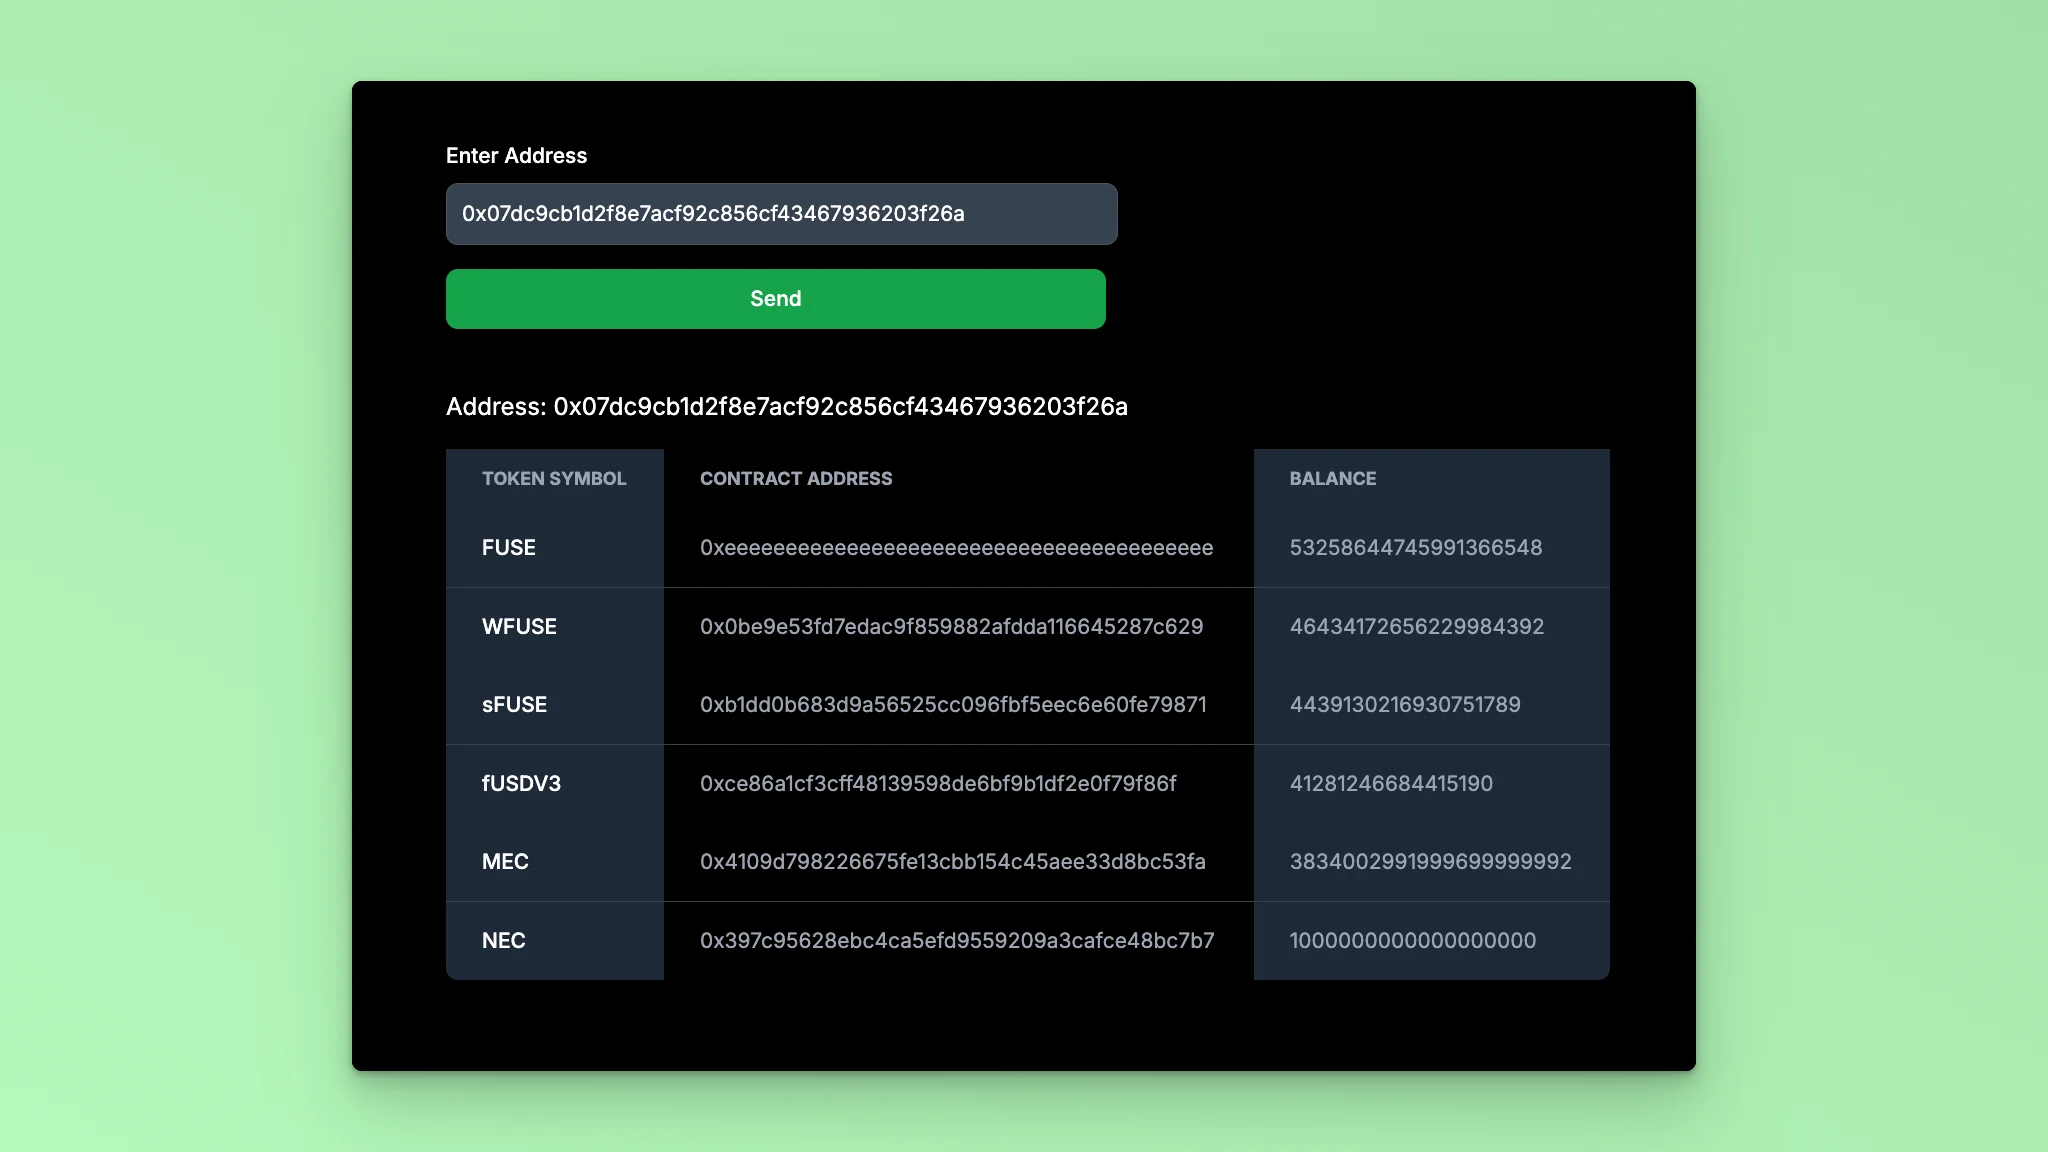
Visit `http://localhost:3000` in your browser to see the application in action. You should see a Form. When you enter an address and click Submit, the response will be displayed in a table with the token names, contract addresses, Balance, and token type.
 ## Code Breakdown:
* State variables `address` and `tokenData` are initialized using the `useState` hook. `address` stores the EOA or SCW address entered by the user, and `tokenData` stores the token data fetched from the API.
* The `apiUrl` variable is dynamically constructed using template literals. It includes the address entered by the user.
* The `handleReturnBalances` function is an asynchronous function called when the form is submitted. It prevents the default form submission behavior, and then calls the `fetchData` function.
* The `fetchData` function is an asynchronous function that sends a **GET** request to the API using the fetch function. It checks if the response is ok, then parses the JSON response and updates the `tokenData` state with the fetched data. If an error occurs during the fetch operation, it is caught and logged.
* The JSX code renders a form with an input field for the user to enter an Ethereum address. Upon submission, the `handleReturnBalances` function is called. The fetched token data is displayed in a table with columns for **Token Symbol, Contract Address, Balance**, and **Token type**.
This example code creates a web application that allows users to enter an address, fetch its balances using a REST API, and display the token data in a table format.
Checkout the complete [code](https://github.com/fuseio/examples/blob/api-address-balance/api-token-balances/pages/index.tsx). 💻
## Code Breakdown:
* State variables `address` and `tokenData` are initialized using the `useState` hook. `address` stores the EOA or SCW address entered by the user, and `tokenData` stores the token data fetched from the API.
* The `apiUrl` variable is dynamically constructed using template literals. It includes the address entered by the user.
* The `handleReturnBalances` function is an asynchronous function called when the form is submitted. It prevents the default form submission behavior, and then calls the `fetchData` function.
* The `fetchData` function is an asynchronous function that sends a **GET** request to the API using the fetch function. It checks if the response is ok, then parses the JSON response and updates the `tokenData` state with the fetched data. If an error occurs during the fetch operation, it is caught and logged.
* The JSX code renders a form with an input field for the user to enter an Ethereum address. Upon submission, the `handleReturnBalances` function is called. The fetched token data is displayed in a table with columns for **Token Symbol, Contract Address, Balance**, and **Token type**.
This example code creates a web application that allows users to enter an address, fetch its balances using a REST API, and display the token data in a table format.
Checkout the complete [code](https://github.com/fuseio/examples/blob/api-address-balance/api-token-balances/pages/index.tsx). 💻